Not me, that's for sure! I'm passionate about them...as you probably already know!
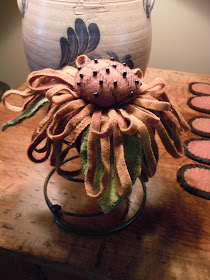
I've seen several different styles of bedspring pincushions similar to the one I made while surfing the internet, so I'm not going to claim this as my original idea. This particular design however, including the dimensions, drawings and how I put it together is.
Here it is, all finished with an updated photo showing the bedspring.
If you'd like to make one of your own, follow along with me.
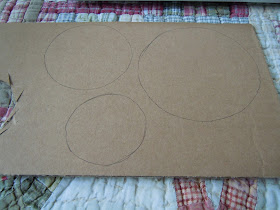
On a piece of strong cardboard, cut out four circles...one each at 7" and 4" and two at 3".
Cut out the 7" circle from the gold plaid wool, the 4" circle from the green wool and the 3" circle from the brown plaid wool.
Draw and cut out a leaf template from the cardboard. Mine is about 3 1/2" long by 2" at the widest part. Trace and cut out 6 separate leaves. Two pieces will be used for each individual leaf. I cut 4 from the dark green wool and 2 from the yellow-green wool.
From the largest gold 7" circle, sew a running stitch about 1/4" in from the edge and all around the perimeter, leaving a tail at each end.
Center the 4" cardboard cutout inside the circle...
and gather by pulling on both ends of the thread. Tie off.
This is how the underside of the flower will look.
Repeat this procedure cutting the yellow-green wool at 4" in diameter and using the 3" cardboard template inside.
Hot glue the WRONG sides of both circles together.
Using either a rotary cutter...or a wool strip cutter if you have one...cut about 30 strips at 1/4" width by whatever length of wool you are using. Subcut approximately 15 - 7" lengths for the first row and 15 - 4" lengths for the second or top row of 'petals'.
Using the smallest or 3" circle, center and trace the outside edge to use as a guide for the 'petal' placement.
Hot glue ONE end of each strip around the perimeter and then the other end of each strip on top of the corresponding strip.
Repeat with the shorter strips to form the second row of 'petals'.
Cut the brown circle at 4" in diameter. Repeat the gathering step as above.
Don't forget to leave two long ends for gathering.
Before adding the cardboard insert, stuff with polyester fiberfill...
then place the 3" cardboard circle on top of the stuffing. Pull the two ends of thread to gather it closed and tie off. This step can be a bit fidgety where you might have to either take out or add stuffing as needed.
Hot glue the center to the top of the flower.
Blanket stitch the two pieces of each leaf together around the entire perimeter then...
back stitch the center vein.
Randomly add some #6 glass beads to the top then glue the three leaves to the underside of the sunflower pincushion.
Hot glue the flower to the bedspring and...
Voila! It's all done!!!
Easy peasy, huh?
Have fun and enjoy!
Happy stitching!


Kaaren, once again a lovely tutorial written and shared, thanks so much for sharing your expertise with us.
ReplyDeleteThank you Kaaren. Can't wait to make one :)
ReplyDeleteThanks Kaaren,this is lovely have a great day
ReplyDeleteThis is wonderful!! THANK YOU so much!
ReplyDeletePxo
Terrific, thanks so much.
ReplyDeleteAnd soooo cute!! : )
ReplyDeleteThis is adorable Kaaren!!! thanks!
ReplyDeleteThanks Kaaren , great tutorial for a really cute pincushion .
ReplyDeleteWhat a sweet little pincushion!
ReplyDeleteDear Karen,
ReplyDeletewhat a wonderful idea, thank you for the tutorial.
Need wool now.
Greetings,
Sylvia
thank you Kaaren !!!
ReplyDeleteThanks for this beautiful tutorial.
ReplyDeleteHow can I get back on your blog list???
ReplyDeleteadorable! thanks for sharing!
ReplyDeleteLove it, thanks! Oh are bedspring pincushions something new? Do you actually get a bedspring from an old box spring?
ReplyDeleteLOVE the pincushion. This is the first project I've seen using a bedspring. Gotta love crafters...find a use for EVERYTHING!
ReplyDeleteAdorable!!!
ReplyDeleteWow, I love it!
ReplyDeleteHow wonderful! When I first saw all of the materials from your previous blog post, I guessed a pincushion. I love sunflowers....
ReplyDeleteI love it! Where does one find the mattress springs?
ReplyDeleteoh my Karren....another wonderful, four star tutorial!!! I have to check you out daily....I have to make 1 (for ME!) today. Keep up the magificant posts w/your talent!
ReplyDelete