Saturday, September 22, 2012

Autumn's Bounty

I love Autumn and the only negative thing I have to say about my favorite season is, "Damn fruit flies!"  I hate the wretched things!  

While at the Farmers' Market this morning, one of my favorite vendors and I got to talking about all the wonderful fruit and veggies that are available at this time of year.  I told her that as soon as I get home and wash everything, the first thing I do is put everything into the refrigerator because of the fruit flies. 

Well, lo and behold, what did she show me?

A "Flies Demise" plant.


It evidently emits the same aroma as fresh fruit which attracts not only fruit flies but also regular house flies and wasps.  The insects fly into the opening at the top of each stem and get trapped inside by little "hairs" where they die.  

Gross, but interesting, huh?


Of course one had to come home with me because I H-A-T-E fruit flies!  

I'll keep you informed as to whether it works or not.


Even though we had a horribly hot and dry summer, our tomato plants just keep on producing.  We've given a slew away and it wasn't until I read this post on Candace's blog that I knew what I was going to do with some of our bumper crop...roasted tomato sauce.


I started as soon as I returned from our Farmers' Market this morning where I purchased some fresh and organically grown garlic and basil.  I was going to make the sauce yesterday but when I went to the supermarket to buy some garlic, the stuff that they were selling was from China!!! 

What the heck is up with that???  No way was I going to buy garlic from China when our local farmers grow it by the truckload!

Let me tell you folks, if you want the tastiest, freshest and E-A-S-I-E-S-T recipe for home made roasted tomato sauce, then read on.

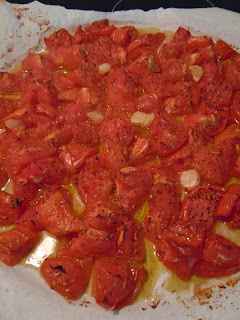
First, I quartered the tomatoes and spread them out on a couple of pizza pans lined with parchment paper.  You can use cookie sheets but mine are in the freezer with blackberries on them.  And get this...no blanching to remove the skin or need to scoop out the seeds!  With this recipe you use the whole enchilada tomato!


Next, I added a bunch of garlic cloves and placed them here and there amongst the tomatoes, added some freshly ground black pepper and then drizzled olive oil over the top.

I then popped both trays into a heated 325 F oven and roasted the lot for two hours.  The aroma throughout the house was yum-a-licious!

While the tomatoes were roasting, I prepared 5 pint sized canning jars and did a little stitching at the kitchen table while Ollie kept me company.


Two hours later I took them out of the oven...


and allowed them to cool.

I added one tray at a time to my food processor along with a handful of fresh basil...


and pulsed the lot for about 15-20 seconds.


Mr. Painted Quilt and I shared what was left after filling five jars...and licked the spoon and bowl clean too!


I think some kind of pasta dish will be on the menu some time this week.

Thanks, Candace!  Not only did she send me the tomato seeds which I started indoors over the winter, but she also inspired me with this recipe which of course I'm going to call "Candace's Roasted Tomato Sauce".


This has been a real light bulb week for Ollie.

He now asks to go outside when he has to do his "thing" by whining at our back door.  Before we had to carry him in and out because he seemed to be afraid to cross over the threshold for some reason.  We decided to take him in and out using the leash on a couple of occasions and I think that's what made him realize that nothing was going to either bite or hurt him and now he does it by himself and without hesitation.

He and Frankie are becoming closer with each passing day.


Best buddies.
They share Ollie's bed every morning as we sip our coffee waiting for daybreak.


I think we need a larger bed, Mom!
Ollie will be four months old on the 6th of October and I can honestly say that the initial puppy stage has passed.  Yay!  He goes to the vet on Monday for his last set of puppy shots and the doggie beauty shop for the first time on Friday.


My Comfort & Joy flimsy (see last post) has arrived at my friend Alice's place in Ontario to be quilted and I don't know if I can contain my excitement while waiting to see what she does with it.  


While Ollie sitting, I've also been making progress on Red Brolly's The Wish quilt.  I've completed six stitcheries so far and am working on the seventh.


And guess who fell asleep while keeping me company as I was stitching?


Shhhhh.  Baby sleeping.
On a personal note, I go for my second follow up CT scan on Wednesday.  

Please keep me in your thoughts and prayers.


Friday, September 14, 2012

Busy Hands!

I've been working away on my Comfort & Joy quilt because I'd like to have it completed in time for the holiday season...this year.  *wink*  

I first saw this quilt on Anne's blog and when she invited her readers to join her in making it at the leisurely pace of one block a month, I decided to take the plunge in...albeit somewhat late.  

I fell in love with the quilt and instead of making mine using the raw edge applique technique as the designers did, I decided use mainly wool applique with some brushed cottons thrown in for good measure.

I wanted mine to look more "primitive" so I chose to use a variety of traditional homespun fabrics in non-traditional colors.  As usual, I also changed up and added a few new elements so mine is not quite the same as the original.

My friend Alice will do the custom quilting and after she performs her magic, I will be adding some additional embellishments before it is completely finished. 


When I applique wool shapes on cotton fabric, I use a product called Steam-a-Seam 2 which is a fusible web that I find works best with the weight and density of wool.  One of the downsides of using any fusible web is that it can leave a sticky residue on the face plate of your iron which can be a pain to remove.

The last time I received my Keepsake Quilting catalog, I decided to bite the bullet and ordered a product called "Iron Clean", pictured below.

This stuff is magic and is so easy to use and with great results!  Each package comes with several reusable sheets that you just run the surface of your hot iron across and virtually instantly, all the glue residue instantly disappears.

Why did I take so long to order it?

If you've ever had the same problem with sticky residue on your iron after using any kind of fusible web, then this product is a definite "must have".   


We bought the fluffy liner below to provide some comfort for Ollie when he sleeps in his crate at night.  But because it's been so hot this summer, we decided not to use it until it got a little cooler.  

With the arrival of the cooler weather, we decided to give it a try.  One day last week, Mr. Painted Quilt placed it on the kitchen floor just to see what Ollie would do.  

He took to it instantly and it is now his favorite "kitchen" bed.


Sure beats sleeping on a wooden floor!
He even shares it with Frankie...sort of.


Move over Ollie.  There's room for both of us!
And now that my Comfort & Joy flimsy is complete, it'll be full steam ahead with my next project...Red Brolly's The Wish quilt!


Sunday, September 9, 2012

Giveaway Winner!

It's a dark, gloomy, humid and wet Sunday here in paradise but I'm not complaining one little bit.  We need the rain and the drier, cooler air is due to return tomorrow.  Yay!

I'm going to make this post short and sweet...short on words and sweet because I just have to share another picture of our sweetheart, Ollie.

Darn, I'm cute!  I have them wrapped around my paw.
I did the random generator thingee and out popped number 25 who just happens to be Karen from My Yellow Farmhouse.

  
Once I obtain Karen's address, my sample of this month's First Friday Freebie will be winging it's way to her as soon as I can pack it up and send it off.

Thanks to everyone for participating.

Friday, September 7, 2012

First Friday Freebie #31 with Tutorial

This will be my last First Friday Freebie until the first Friday of December.

In case you missed my last post, I have decided to release my FFF's on a quarterly basis...December, March, June and December.  

Training a new puppy takes a lot of time and effort and I'm finding that I just don't have enough time to devote to both Ollie and designing and and you know who comes first.  He is progressing really well but it has been fifteen years since we last had a puppy and if the truth be known, we had forgotten just how time consuming training can be.  Once Ollie is fully trained and can be trusted to be left on his own, I am hoping to return to my monthly FFF's.  Thank you all for your support and understanding.


~ * ~ * ~ * ~ * ~

They say a picture is worth a thousand words so this month I decided to take photos of each step as I progressed. 

Here is my Autumn Pincushion.


Cut a 12" x 12" square from your background fabric.  This might sound a little large but I cut mine to this size in order for it to fit easily into a hoop for stitching.

Transfer the design including the half circle surrounding the design to the fabric using using a light source such as a window during daylight hours or a light box.  Center and tape the fabric over the design and trace using a fine tip permanent black Pigma pen.

After tracing but before starting to stitch the design, you might want to adhere a lightweight fusible interfacing to the wrong side of the background fabric to add both stability and durability.

All the backstitching is done using two strands of #310 (black) DMC floss.  Upon completion, iron to remove the wrinkles.


Cut out around the half circle that was a part of your original tracing.


Fold the fabric in half, right sides together.


Then sew a 1/4" seam down the straight edge and iron the seam open.


Turn right side out.  With a doubled or stronger weight thread, run a basting stitch around the top edge about a 1/4" in.  


Stuff with polyester fiberfil then pull on both ends of the thread in order to gather the opening "almost" closed.  Knot to secure.  


Cut out the leaves and center circle from scrap felted wool.  Make sure that the circle is large enough to cover the opening.


Using a blanket stitch, sew the circle around the opening. 


Center the leaves on the circle and tack them down.  I back stitched a vein about two thirds the way up the center of the leaves and then sewed on a vintage button to hide the tacking stitches.


Embellish with decorative pins and anything else that suits your fancy.


To download the photos and line drawing for this month's design, please click HERE.

And if you'd like to win my sample, just leave me a comment to that effect at the end of this post...and I'll ship internationally!  I will announce the winner on Sunday, September 9th.  Remember, if your email address is not included in your profile, then you will show up as a "no-reply" blogger and will automatically be excluded from the draw.  If you are unsure, just leave a contact email address within the body of your post.


I'll leave you with this photo of Ollie cuddling with Mr.Painted Quilt after having his breakfast this morning.  


Isn't he precious?

Sunday, September 2, 2012

Whew!

I think I've finally settled down and have come to grips with the hacking of my email account.  Evidently this same thing happened to thousands of people on Friday night and there's some comfort in knowing that I was not being singled out.  It goes without saying that I'd still like to wring the little twerp's neck.

There has been a welcome chill in the air the last two nights.  It felt so good to snuggle under the covers and to stay that way for the entire night.  

Many signs of Fall were present at our Farmers' Market yesterday and I just couldn't leave without bringing home a few pumpkins and a potted mum.


The tomato plants in our kitchen garden are full of fruit.


We are having a hard time keeping up with the daily yield.  I picked these just this morning while watching Ollie frolic in our back yard.


With the cool down in temperature, I decided that it was finally time to turn the oven on and do a little baking.  I've been feeling a little guilty lately because it seems like ages since I last cooked a "proper" meal. 

These cranberry muffins hit the spot for breakfast with a cup or two of some freshly perked coffee.


On Sunday, we usually like to eat dinner early and today I cooked a turkey breast...


along with some new red potatoes from the market and a tomato (from our garden) based veggie casserole.


Can you tell that Mr. Painted Quilt was hungry?


And for dessert, we had some deliciously cold yellow watermelon, grown by our friend Cliff.


Of course Ollie was cheering me on while I was prepping all the goodies.


Hi guys!  It's me, Ollie.  I'm getting big, huh?
And while dinner was cooking, I started working on the third stitchery of the Wishes quilt that you can downoad for free at the Red Brolly.  

I'm going to love this quilt when it's done.


I also have some news that I'd like to share with you.  I was going to announce this on Friday when I post this month's First Friday Freebie but decided to give you all a head's up today.  

Because there are many people who visit my blog on the first Friday of every month only to download the free design and not read the entire post, I'm hoping to reach as many of you as possible today and I'll mention it again again on Friday.

After much deliberation, I've decided to cut down on my FFF's to just once a quarter.  I've been feeling a little stressed lately because with Ollie being a puppy and needing so much attention, I just can't devote the time needed to both his training and my designing.  One is bound to suffer and my first commitment is to Ollie. Having said that, I'm hoping to be able to go back to my monthly designs once he is fully trained and can be trusted to spend more time on his own.

So after this Friday, the 7th of September, my next FFF will be released on the First Friday of December, followed by March, June, September and December of 2013.  So be sure to stop by on Friday because you just never know...there just might be a little giveaway as well.

Thanks for understanding.